사실 공식 document에 잘 나와있긴 하다. 근데 내가 쓰기 편하려고 모아보려 한다.
- 공식 가이드는 여기 (https://platform.openai.com/docs/guides/batch)
- 실시간 배치 상황 보려면 여기 (https://platform.openai.com/batches)
우선 배치를 쓰는 이유가 뭐냐면, 당연히 싸기 때문이다.
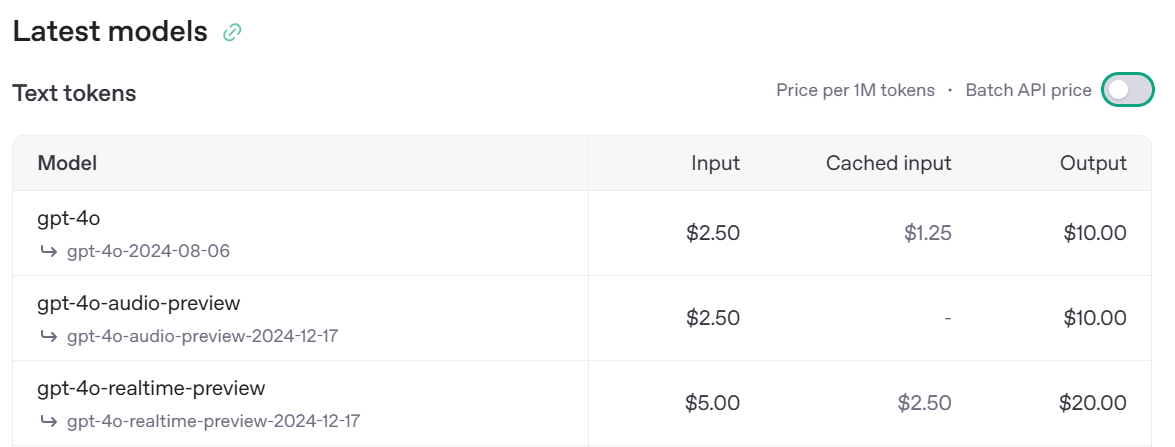
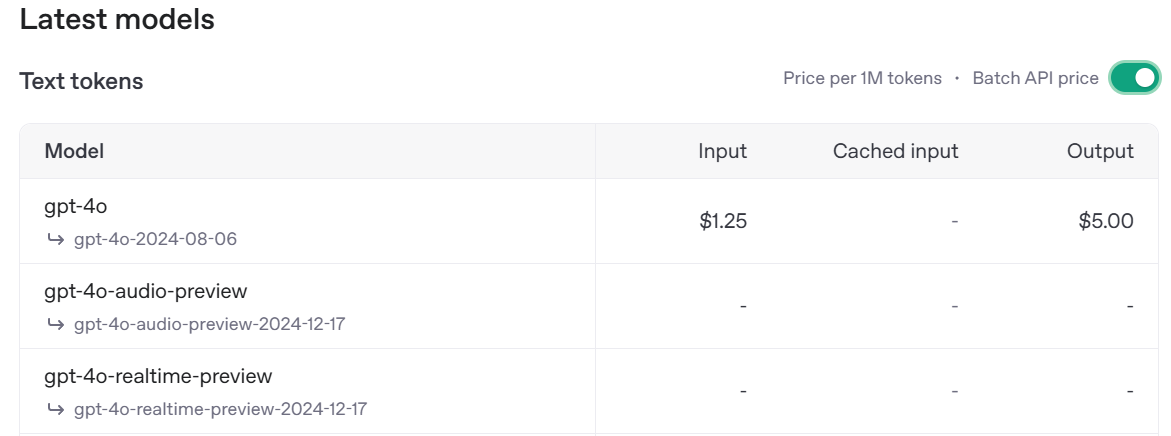
반값이라는 파격적 가격 할인!
물론 audio 처럼 안되는 기능들도 존재하지만...
주기적 / 대량의 텍스트 데이터 처리를 할 때 비용 절감을 위해서는 꼭 필요하다.
(deepseek api가 안정화되기 전까지는 계속 써야할 듯...)
그럼 이제 GPT 배치 요청 넣고, 받아와서 가공하는 법까지 알아보겠다.
1. Batch JSONL 만들기
현재 api를 batch로 쓰려면 jsonl 형식으로 넣어줘야 한다.
따라서, 형식에 맞게 jsonl을 채워주자.
# generate
with open(BATCH_JSONL_PATH, "w", encoding='utf-8') as f:
    for _, row in corpus.iterrows():
        json_line = json.dumps(
                        {
                        "custom_id" : f"request-{row['_id']}", # 고유 ID 수동 할당
                        "method" : "POST",
                        "url" : "/v1/chat/completions",
                        "body" :
                            {
                                "model": "gpt-4o",
                                "messages": [
                                        {"role": "system", "content": SYSTEM_PROMPT},
                                        {"role": "user", "content": f"input : {row['text']}"}
                                    ]
                                },
                        },
                        ensure_ascii=False
                    )
        f.write(json_line + '\n')
        id_list.append(f"request-{row['_id']}")
        metadata_df.loc[len(metadata_df)] = [f"request-{row['_id']}", row["text"], ""]


print(f"## jsonl file saved in {BATCH_JSONL_PATH}")

metadata_df.to_csv("{METADATA_PATH}.csv", index=False)
후에 인지하기 쉽고, 원본 데이터랑 매핑하기 편하도록 2가지를 넣는 편이다.
- custom_id : request id를 고유하게 할당 가능
- metadata_df : 원본 데이터를 저장하고 있는 데이터프레임. 여기에 할당한 고유 request id를 "id" column에 넣어준다. (추후 매핑을 위함)
위의 코드는 generate 용도의 jsonl이고, Embedding 용도는 jsonl 형식이 조금 바뀐다. (url이라던가)
이건 공식 홈페이지에 잘 나와있다.
2. Batch input 업로드
jsonl로 만들어둔 파일을 Batch API에 업로드한다.
load_dotenv(verbose=True)
client = OpenAI(api_key = os.getenv('OPENAI_API_KEY'))

BATCH_JSONL_PATH = "./data/{FILE_NAME}.jsonl"

batch_input_file = client.files.create(
    file=open(BATCH_JSONL_PATH, "rb"),
    purpose="batch"
)

api_meta = client.batches.create(
    input_file_id=batch_input_file.id,
    endpoint="/v1/chat/completions",
    completion_window="24h",
    metadata={
    "description": "make generation"
    }
)

batch_input_file_id = batch_input_file.id
print('## request_id : ', batch_input_file_id)
print('## batch id : ', api_meta.id)
여기서 client.files.create 의 반환값 id로 나오는 것이 input file id이고 (코드에서 batch_input_file.id)
client.files.batch의 반환값 id로 나오는 것이 요청보낸 batch id이다. (코드에서 api_meta.id)
batch id는 현재 배치 처리가 어떻게 동작하는지 status를 알려주는 데 쓰인다.
혹시 따로 batch id를 뽑지 않았더라도, (https://platform.openai.com/batches) 여기 들어가면 내가 올려놓은 batch 상황이랑 batch id를 확인할 수 있다.
하지만 batch 요청 일시랑 input file 이름만 가지고 목록에서 찾아야 하니 주의할 것!
나는 빠르게 status를 계속 보고 싶어서 1분마다 status를 체크해주는 로직을 작성했다.
def cancel_batch(id_list, custom_id=None):
    # custom id 입력 있을 경우 -> 특정 request id만 cancel
    if custom_id != None:
        client.batches.cancel(custom_id)

    else:
        for request_id in id_list:
            client.batches.cancel(request_id)
    return


# batch id 받아서 status 확인
def get_batch_status(batch_id):
    return client.batches.retrieve(batch_id) # 추후 출력파일 받아올 때 쓰임
import time

while get_batch_status(batch_id=api_meta.id).status != "completed":
    status = get_batch_status(batch_id=api_meta.id)
    print('## current status : ', status.status)

    if status.status == "completed":
        output_file_id = status.output_file_id
        print(f'## batch completed!/noutput file id : {output_file_id}')
        break

    else:
        print('## Wait untill completed...')
        time.sleep(60)
물론 row가 몇 천개 이상이거나 텍스트 량이 많을 경우 1시간은 넘게 걸리니 리소스를 낭비하지 말고 홈페이지에서 status를 확인하자.
3. Batch Completed
배치 처리가 성공적으로 끝났다면, status를 찍었을 때 completed가 뜨거나 홈페이지에서 초록불을 확인할 수 있을 것이다.

다만 이렇게 completed가 떴더라도, 완전한 성공은 아닐수도 있다.
무슨 말이냐면,

이렇게 일부가 failed 되어도 status 상에서는 completed로 뜨기 때문이다.
이것 땜에 개수 안맞아서 살짝 당황했다.
이렇게 일부 실패처리가 뜬 경우에는 어떻게 해야 하는지 다음 포스팅에 이어 적어보겠다.
모든 requests가 정상적으로 완료되었다고 가정하고,
이제 output file을 받아올 차례이다.
def get_batch_answer(output_file_id, result_path):
    answer = client.files.content(output_file_id).content
    with open(result_path, 'wb') as file:
        file.write(answer)

    print(f'## file saved in {result_path}')
    return

status = get_batch_status(batch_id=api_meta.id)
output_file_id = status.output_file_id

get_batch_answer(output_file_id = output_file_id, result_path=f"./data/{RESULT_PATH}.jsonl")
이렇게 하면 원하는 위치에 받아온 output jsonl이 저장될 것이다.
4. 후처리
받아온 jsonl은 다음과 같은 형식일 것이다.
{
	"id": "batch_req_",
    "custom_id": "request-0",
    "response":
    {
        "status_code": 200,
        "request_id": "",
        "body":
        {
            "id": "",
            "object": "chat.completion",
            "created": 1738677866,
            "model": "gpt-4o-2024-08-06",
            "choices": [{"index": 0, "message": {"role": "assistant", "content": "output : ", "refusal": null}, "logprobs": null, "finish_reason": "stop"}],
            ...

}
정상적이라면 status_code : 200 이 뜨고
나의 목적은 gpt를 통해 얻은 결과값을 데이터프레임(앞서 저장한 metadata_df) 에 넣는 것이었으므로, 이에 맞는 처리가 필요하다.
# UTF-8 인코딩으로 파일 열기
with open(f"./data/twice/translation/batch_jsonl/BATCH-ko-trans-HeadlineAC-PairClassification.jsonl", 'r', encoding='utf-8') as file:
    data = []
    for line in file:
        # 각 줄을 JSON 객체로 파싱
        json_obj = json.loads(line)
        data.append(json_obj)


kr_sent1 = []; kr_sent2 = []

for idx, request in enumerate(data):
    answer = request["response"]["body"]["choices"][0]["message"]["content"]

    # answer 후처리
    try:
        sent1, sent2 = answer.split(" | ")
        sent1 = sent1.replace("output : ", "")

    except:
        print(idx, f"## answer : {request['custom_id']} format is not aligned")

    # 동일한 request_id 가진 metadata 불러와서 매칭하기
    metadata_df.loc[metadata_df["request_id"] == request["custom_id"], "kor_sent1"] = sent1
    metadata_df.loc[metadata_df["request_id"] == request["custom_id"], "kor_sent2"] = sent2
이런 식으로 기존 metadata_df에 저장해뒀던 custom_id 값을 이용하여 매핑해주면 된다.
또한 gpt가 가끔 출력 포맷을 이상하게 뱉는 경우도 있다.
예를 들어 나는 ("A" | "B") 형식의 포맷을 원했는데 ("A", "B") 이렇게 왔다던지..
이런 경우 별도의 후처리나 재생성이 필요하므로 따로 인덱스를 저장해두는 편이 좋다.
'NLP > 프로젝트' 카테고리의 다른 글
| GPT Batch API 활용법 (2) - 오류 해결 (0) | 2025.02.06 |
|---|---|
| 좋은 프로젝트란 무엇인가? - 기획편 (0) | 2025.01.16 |
| How to Build domain-specific Embedding model - (2) : Dataset (35) | 2024.12.11 |
| Azure Function - Mac setting (1) | 2024.12.09 |
| Azure Function - Windows setting (3) | 2024.12.09 |


